KPOV Judge offers exercises in computer networks and security. Each exercise comes with a set of disk images for virtual machines, which must be set up and configured to perform certain tasks. Here we explain how to attempt and solve an introductory task.
Log in to the KPOV Judge website using your university credentials (the same username and password as for the online classroom, e.g. ab1234@student.uni-lj.si). Select the course and task – here we will look at the first task in the FRI DF 2019 class, called 01-set-motd.
The task page contains instructions and links to disk images in multiple formats. VMDK is supported by most emulation software. GNS3 and other qemu‐based programs also support qcow2. The qcow2 images use backing files, which allows us to reuse most data across several tasks. Backing files should be downloaded only once and placed in the same directory as the task‐specific images.
You can solve tasks using any virtualization software. We recommend GNS3: it makes the network layout more visible, can run Wireshark on any link in the network, and uses a serial console that supports pasting text. Here we give instructions for GNS3 and VirtualBox, which is somewhat easier to set up.
VirtualBox
For Windows or Mac, download VirtualBox from the official website. On Linux, install it from your distribution’s repositories (e.g. with apt install virtualbox on Debian-derived distributions).
VirtualBox does not support disk images with backing files. You can use standalone VMDK images, which take longer to download. As an alternative you can convert the qcow2 images into the required format yourself.
Computers
Create two virtual machines, arbiter and student, with corresponding disk images. Default settings should be fine. After creating arbiter, go to machine settings, select network, and enable Adapter 2. Set it to internal network with any name. The first adapter should stay set to NAT.
Network settings for arbiter
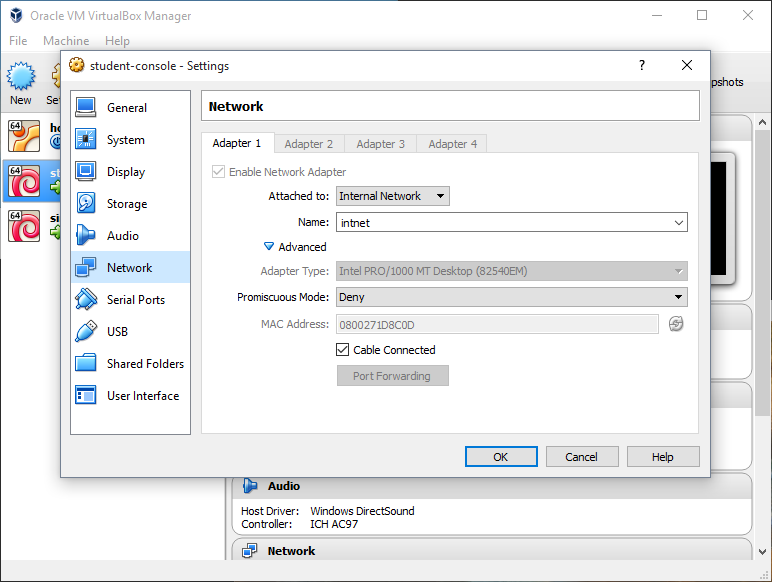
Leave the single network adapter enabled for student, and set it to the same internal network as arbiter. This will be our local network; arbiter is connected to the Internet and acts as a router for this network. The local subnet is 10.94.94.0/24.
Network settings for student
Now you should be able to start the virtual machines and log in. Continue setting up the machines according to instructions in the next section.
GNS3
GNS3 is a bit more involved to initially set up than VirtualBox. On most Linux distributions additional repositories are needed to get non-ancient releases, while Windows and Mac versions must be installed during a lunar eclipse to obtain hardware acceleration. Once set up, however, GNS3 is a powerful network simulation tool.
Windows
The easiest way to set up GNS3 to run well on a Windows or Mac machine is to first install any Linux distribution and then skip to the next section. The less adventurous can install Linux in a virtual machine and run GNS3 there.
Another option is running the GNS3 server in a dedicated virtual machine, which you can set up during installation. This option tends to be problematic, however, so it is usually simpler to use software emulation by running the GNS3 server directly. This is somewhat slower, but should not be a problem for any machine not older than ten years. Make sure that you choose to »run the topologies on my computer« as shown below.
Disable the GNS3 VM
Linux
To install GNS3 on Linux, follow the official instructions. On Ubuntu and derived distributions use the following commands:
On the first run a setup wizard appears – the default settings should be OK, so just confirm them. If you select »Don't show this again«, the wizard won’t appear in the future. If you get permission errors make sure that you are a member of the following groups:
# usermod -a -G ubridge,libvirt,kvm,wireshark [user]
Computers
The New appliance template window pops up the first time you run GNS3. When creating new virtual machines, select »Qemu virtual machine«. You can also add new devices from the preferences window (Edit ▸ Preferences…) by clicking New in the Qemu VMs sections.
Type in the device name (»arbiter« in this example), confirm default settings and select the disk image. You can add additional disks or network interfaces by clicking the Edit button. When using qcow2 images it is important to select No when asked to copy the disk image file, since they must remain in the same directory as backing files.
Add the computer arbiter as shown in the video below. Note that arbiter must be edited to use two network interfaces.
Adding the arbiter computer
Add the computer student in the same way.
Adding the student computer
Once you have created the virtual machines, start a new project for the task in GNS3. Click the Browse all devices button in the sidebar and choose to show only »Installed appliances«. Set up the network by dragging the arbiter and student computers onto the canvas and connecting them using the Add a link button.
Connection to the internet is represented by the NAT widget; connect it to arbiter’s first network interface (Ethernet0). This should allow arbiter to connect to the internet, and make it accessible from the host.
Setting up the network
Click the green Start/resume all nodes button to power on the virtual machines. You can open a console on a running computer by double‐clicking it.
Task
Video instructions are available, which are now somewhat outdated – adjust accordingly. This section gives an updated solution. There are two parts to the task 01-set-motd: creating a user and changing the message of the day.
Adding a user
Open a console on student and login as root with the password kaboom. Add a new user with the Debian command adduser. You will be prompted for the user’s password (nothing is shown as you type it). You can leave the details about the user blank.
# adduser ivanbrglez33
Adding user `ivanbrglez33' ...
Adding new group `ivanbrglez33' (1001) ...
Adding new user `ivanbrglez33' (1001) with group `ivanbrglez33' ...
Creating home directory `/home/ivanbrglez33' ...
Copying files from `/etc/skel' ...
Enter new UNIX password:
Retype new UNIX password:
passwd: password updated successfully
Changing the user information for ivanbrglez33
Enter the new value, or press ENTER for the default
	Full Name []:
	Room Number []:
	Work Phone []:
	Home Phone []:
	Other []:
Is the information correct? [Y/n]
Instead of logging in as root, you can log in as the user student with the password vaje. In this case you can use the su (for switch user) command to become root. Be careful not to omit the argument - to the command below; it instructs su to create a login shell with root’s environment variables including $PATH.
$ su -
#
Setting MOTD
Message of the day is stored in the file /etc/motd; open it with your favorite editor and append the required message. If you don’t have a favorite editor, this is as good a time as any to learn vim. Open the file by running (as root):
# vim /etc/motd
Vim is a modal editor, which means you have to press a key to go into insert mode before adding text. Press i and type in the text in the niz parameter (e.g. Batteries not included.) You can keep the original message from Debian or delete it. Once you are done inserting text, press Escape, then type :wq, which writes the file to disk and quits.
Batteries not included.

The programs included with the Debian GNU/Linux system are free software;
the exact distribution terms for each program are described in the
individual files in /usr/share/doc/*/copyright.

Debian GNU/Linux comes with ABSOLUTELY NO WARRANTY, to the extent
permitted by applicable law.
~
~
~
-- INSERT --                                                  2,1           All
Testing
After you have completed the task, open a console on arbiter and login as test with the password test. Run the test_task.py script to check your work. If you are running the test script for the first time, you will have to enter your KPOV Judge username and password:
$ ./test_task.py -l en
Root URL for all tasks: https://kpov.fri.uni-lj.si/kpov_judge3/tasks/df_2019/
Task name: 01-set-motd
Username: ab1234@student.uni-lj.si
Password:
The -l parameter sets the language; try ./test_task.py --help for more options. The scripts prompts you for task parameters. Some are generated randomly and pre-filled. You must choose and enter the other parameters – such as the IP address and user password in this task – yourself.
Username: ivanbrglez33
IP: 10.94.94.34
The string which should be displayed in the MOTD: Batteries not included.
Password: x
The testing script typically checks your work by connecting to other computers and running various programs there. Results are compared to anticipated values to produce a final score.
Running task…
Checking task…
Done!

Score: 4
Hints:
status: OK
wrong motd:

Linux student 4.19.0-2-686-pae #1 SMP Debian 4.19.16-1 (2019-01-17) i686

The programs included with the Debian GNU/Linux system are free software;
the exact distribution terms for each program are described in the
individual files in /usr/share/doc/*/copyright.

Debian GNU/Linux comes with ABSOLUTELY NO WARRANTY, to the extent
permitted by applicable law.
ivanbrglez33@student:
This output shows only four points due to an incorrect message of the day, which is printed after script status. To fix this, we should log into student and add the required line to /etc/motd. The passing (and top) score for all tasks is 10:
$ ./test_task.py -l en -q

Running task…
Checking task…
Done!

Score: 10
Hints:
status: OK